New: 2/15/...here is an update on the newest Batura worth looking at, asthe Batura has some significant changes for the better.http://coldthistle.blogspot.com//02/new--la-sportiva-batura_14.html
 As always a caveat.
 My foot isn't your foot. Some will find the
Batura a much better boot for them than the Guide. And some will find the Guide a better fit and boot for them than the
Batura. I really like and believe in the potential of a "super
gator" style boot for cold weather climbing. I don't think of either of these boots as being perfect. Despite both companies best effort to date either boot is too heavy for their warmth
imo.
The La
Sportiva Batura in my size 45 weights in at 2lb 7oz per boot. The
Scarpa Phantom Guide in a size 45 weighs in at 2lb 7.5oz. Both should be closer to the 2lb they advertise.
As a comparison in size 45 both the La
Sportiva Trango Exteme Evo GTX and the Nepal
Evo GTX offer similar warmth while admittedly differing levels of protection. The
Trango weight in at 2# 3oz, the all leather Nepal
Evo at 2# 10oz.

I have intentionally updated the previous La
Sportiva Batura review to put it on the same page as this review and the comparison of the
Batura along side the newest
Scarpa Phantom Guide.
In many ways these two boots are very old school. Basically light weight single boots with a short, Peter Carmen style "super gator" permanently attached as noted in the
Batura review. It was a system that allowed us to use a lighter weight boot that climbed better technically and still have enough warmth to use the system in Alaska during the spring if you didn't go too high and winter in Canada if it didn't get too cold.
Lots of "ifs" in that statement but it worked without cold injuries, generally. Still there are places cold enough that a single boot just is not enough and enough cases of frostbite from those using
Super Gators and good single boots on cold, difficult routes many quickly realised double boots were a better answer. Lucky for us
Koflach came out with the Ultras about that time and then dominated the market for cold weather technical climbing for the next 20 years.
The flip side to that is both the Phantom guide and the
Batura are chock full of high tech materials and technology.
But let me address a couple of things first that should be mentioned about fabric boots (both the
Scarpa and La Sportive here are "fabric" boots) that are important.
"Mountain Guide and
Scarpa consultant, Brian Hall emphasises that the Phantoms won't last as long as traditional leather and plastic mountaineering boots, but the sort of climber who uses them is after maximum performance regardless of cost..."
Nice of Mr. Hall and
Scarpa to so easily admit that fact. La
Sportiva on the other hand doesn't bother to mention it at all. No matter just how true it
REALLY is. The majority of time I have spent in boots over the last 10 years has been in fabric boots. The exceptions have been the newest Nepal
Evo and the older, blue
Scarpa Frenzy. Both fully rigid soled, leather boots and both build stout for technical climbing and to last.
It would take me multiple years to wear either leather boot out and you would go through several resoles before you did.
Admittedly I have a hard foot to fit and am rough on boots because I have skinny feet in a size 12 US and weight in at 200# on a good day. Add a pack and gear to that and easy to be pushing 225# plus while climbing when all geared up.
There are times I prefer some extra ankle and forward support to ease the calf strain of the leverage on a big foot and my climbing weight. I've not found a technical, all fabric boot that will do that yet, short of the very best dbl boots, like the Phantom 6000, the
Baruntse or
Spantik.
And the kind of support and warmth a double boot offers isn't always needed let alone desired.
In
Chamonix the previous versions of the
Scarpa Phantom 6000 and the Phantom Light had the enviable reputation of being extremely durable compared to the
Batura (which broke zippers and had wear issues on the fabric) or the
Spantik (which broke laces and eyelets.

The La
Sportiva all fabric
Trango series of boots have lots of complaints on sole wear and fabric durability. All complaints I originally chose to ignore. While I love the original sticky soles of the
Trango Evo series, the durability and support of the
Trango is dismal even after just a little use. I basically wore a pair of
Trango Extreme
Evo GTX boots out in 3 months of ice climbing on just the weekends! That is CRAZY and expensive!
So while I am willing to put up with a reputation that matches "the sort of climber who uses them is after maximum performance regardless of cost" I am not willing to buy a new pair of boots every 6 to 9 months no matter how high the performance.
If you want a boot to last from today's choices, buy a leather boot. The Nepal
Evo and the
Scarpa Mt.
Blanc are exceptional,
lwt, technical leather boots. If you don't want to buy new boots every year I'd strongly suggest
buying leather.
I feel the Super Gator/single boot idea is worthy of support. Most of my hard climbing has been done in one form or another of that combination up to and including the
Batura the last couple of winters.

The original
Scarpa Phantom Light,
Scarpa's previous model to the Phantom Guide.
So let me get into the
Batura / Guide comparison so you can see what I think are the real differences are.
The
Batura has lots of things going for it and some faults as well to fit me correctly. And I really do wish the
Batura did fit me correctly.
Batura's faults for my foot and fit:
Loose ankle cuff that doesn't tighten on my skinny ankles.
Not enough padding or width in the boot tongue for comfort or support
Hard to lace lower
Not enough lacing on the upper cuff and what is there is poorly placed and designed
Poor seal on the gaiter
Not enough support side to side and forward on the cuff
Terrible, super soft ankle flex, with almost zero support
Hard to keep dry inside and hard to dry out

An additional lower boot eyelet at the ankle and a third set of upper cuff lace hooks make the Phantom Guide different from the
Batura. With the addition of a more
substantial and well padded tongue all combine to offer more support in the ankle with no loss in flexibility.

The excellent sewn on gaiters of both boots are
virtually the same height when snugged as they generally would be in use.

The lower lace system on the Phantom Guide also offers a lace "pull" that greatly increases the ability to tighten and just as importantly,
untighten, the lower boot in use.
The Phantom Guide allows me to make my crampons one click smaller for size but mandate the use of a asymmetrical center bar for a proper fit.
The advantages of either boot?
Short integral gaiter.
More water resistance and warmth that a typical leather/fabric boot because of the full coverage gaiter
Flexible cuffs that allow for easy walking and good flexibility to rock or mix climb
Rigid soles for full clip-on crampons
Warm enough for all but the coldest temps
In my size 45 the insole is slightly longer on the Phantom Guide while the over all volume is slightly less on the outside than the
Batura. The Phantom Guide is a more trim, lower volume boot and closer fitting boot than the
Batura on my foot which makes rock and hard mixed easier.
The issues the Phantom guide solves for my foot.
ankle cuff will tighten on my skinny ankles.
Good padding and width in the boot tongue for comfort or support
easily lacing lower
upper and lower boot have enough eyelets for a proper fit
Good seal on the gaiter
Good support and progressive flex on the ankle
Goretex and
Primaloft 1 should help keep the boot dry and help dry the boot once wet
One of the down sides to the
Batura is the insulation inside the boot gets wet in use from sweat. And more importantly the
Batura then becomes extremely hard to dry out in the field. The P-Guide on the other hand has a removable
Primaloft 1 inner sole and the boot is also insulated with
Primaloft 1. From my other experiences with
Primaloft I know it dries faster with body heat than any other insulation I have used.
Primaloft 1's insulation value and warmth is way out of proportion to the thickness used. Add to that a
Goretex liner in the
Scarpa P-Guide. Both
Primaloft and
Goretex should offer distinct advantages of the
Scarpa over the
La Sportiva in staying dry both from your body's moisture and the outside elements.

I've yet to had the opportunity to use this boot in very cold weather but I would expect the P-Guide to be a warmer boot than the
Batura. Not a lot warmer mind you, but warmer and certainly easier to dry out in the field.
Easier to get in and out of the P
-Guide and the laces lock my heels in much better. In general the S-Guide just fits me better over all. There isn't a lot more support in the ankle on the S-Guide than the
Batura but what is there is noticeable and more comfortable for me. Certainly a lot less heel lift on the S-Guide no matter how you chose to tie the boot compared to the
Batura.
I am still trying to wrap my head around how
comfortable it is to walk in both these boots. Much of alpine climbing is spent on the approach. So walking is important. Although I will generally give up
that comfort for the support of a heavier boot. This winter I used a La
Sportiva Trango Evo Extreme on a number of long approaches and water fall climbs including no approach but some good ice on a quick ascent of Polar Circus.

Because of the ridiculiously easy ease of access I use ascents of Polar Circus a a testing ground for a lot of gear. Never thought I would enjoy a really light weight set of boots on a climb of that length. But there is enough walking to take advantage of a boot like the
Trango,
Batura or Phantom Guide. The longest stretch of front pointing is easy terrain on the approach pitches. You never climb more than 100m of steep ice in one session before getting a ledge or snow again up higher.
So for climbs like that or road side
cragging on things like Curtain Call, Nemesis or even Slipstream I think any of these soft and
lwt fabric boots are great. Just pray you don't have to spend a cold, unplanned night out in them. Because without some serious preventive measures most will have wet feet at the end of a long day in these boots. The full gaiter covering these boots keeps them drier and warmer for longer days walking and climbing but I'll repeat myself, they are not a replacement for a dbl boot. If they were only more durable they might well be good as summer alpine ice boots. Hopefully I'll be able to give a follow up on how the Phantom Guide holds up in those conditions.


7!Bmk~%24(KGrHqMOKj0EuuHFc0soBLwffgKh8Q~~_3.jpg)
Thankfully both
Scarpa and now La
Sportiva are using the T-ZIP for better water resistance on the gaiter and better durability.
Scarpa has long used the T-ZIP on their previous generations of Phantom boots and have an enviable reputation.
 Some of that "easy" 50 degree alpine ice.
 First things first. Attention everyone. There was a wicked layer of surface hoar that didn't get any sun action today before the clouds started rolling in. It's going to get buried. There are all sorts of facets in the snow in the top 20 cm. What's worrisome is that the surface hoar is growing on a layer of sun crust. Underneath the sun crust is another layer of facets. Check out the snowpit profile.
 So the rest of the trip to Muir was outstanding. Skiing was 7 out of 10, for the windswept snowfield, anyway. The new snow that is forecast should make the skiing even better.
 This is it. Finally our snowpack at Paradise is back to normal at 78 inches. The rain from the last warm spell has stopped and we have up to 18 inches of new snow that has consolidated and another 5 inches of pretty light snow on top of it.


 Well, it seems that we've been having one of two weather conditions in Boston lately: (a) blizzard, or (b) in between blizzards. When it's the latter, I have been riding my bike - sort of. To be honest, I would not be doing it if I didn't have to, because the road conditions are pretty bad. But the bus makes me motion sick, the nearest subway stop is a 15 minute walk from our house(longer in the snow), and the sidewalks are slippery. So except on days when the roads are completely impassable, cycling seems to be the least daunting option. Still, "least daunting" doesn't mean "easy," and I've had to make a number of adjustments to the way I ride a bike, in order to be able to do it at all.
  For one thing, I cycle much slower than usual, because I am scared of hitting not only ice patches, but those mini-mountains of hard snow that seem to pop up when I least expect them, like some treacherous obstacle course. Cycling slowly allows me to see them in time to either brake, or figure out how to go around them safely (I am a slow thinker when it comes to spacial rotation tasks). Happily, there are almost no other cyclists on the roads, so there is no one to get annoyed at my crawling speed - I've found that I can go as slow as I like, and no one seems bothered. I guess to cars, it's pretty much the same whether I am cycling at 7mph or 20mph: Either way, they are faster than me and will have to pass me eventually.
 I also simply accept that I will have to get off my bike and walk a lot - across impassable stretches of slush and even over snowbanks. Sometimes I'll walk for a quarter of a block, then get back on the bike and ride for a couple of blocks, then get off again, and so on. It's annoying, but still better than walking the entire way - at least to me. Warmer and faster.
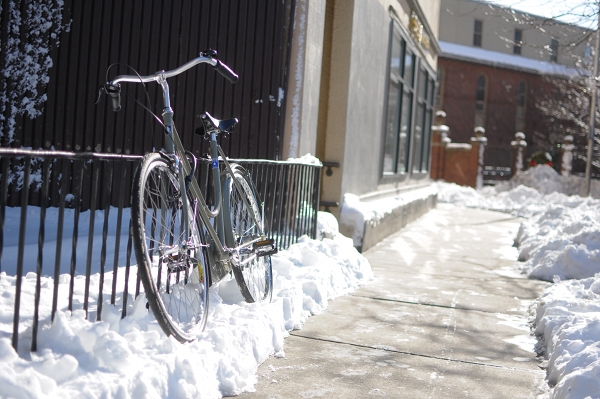 Finally, I've been having to get really creative about locking up my bike. Most bike racks have been made inaccessible by the surrounding knee-deep snow. So I will usually chain my bike to a fence, or whatever is handy - often having to rest it on top of a snowbank.
 Since the start of the Spring season, I have been getting emails from women that read something like this:
 Also, even if you have been cycling since age 5 and can compete in timed half-centuries in your sleep, consider downplaying your prowess and adapting a "leisure cycle" mode. Don't kit up. If you have an old beater bike, ride that when you are together instead of your super-fast roadbike. I would even go so far as to suggest buying an old vintage upright-ish bike for yourself, to match the level of the bike your spouse will be riding. This will even out the playing field between the two of you and will make you less intimidating.
 One of my favorite things to do while sitting at the beach, is to watch the surfers.

 Interesting clouds. Nice, yes?
 But then I walked further down the road.
 A change of position and I zoomed in a bit more.
 Just a little further down the road.
 It just got better with each passing minute.
 And then it was over.
 Whenever there is mention of a bicycle's gearing, inevitably we bring up gear inches. And when there is a question of what gearing is best on a new bicycle, someone will suggest to calculate the gear inches on a bike the person is already comfortable with and use that as a template. But here is the thing: While I known how to calculate gear inches, I've been finding this mostly useless when setting up a new bike - because, in my understanding, gear inches are bike-specific. In other words, the same gear inches don't feel the same on different bikes. What am I missing or misunderstanding here?


