Sunday, June 28, 2015

Duck Butts

A lot of ducks feed off the bottom of a lake or pond and when they do they turn their little tails up to get their beaks down to where the food is. These ducks were doing that. I think they are mallards. I decacate this post to my niece who, as a tottler thought that duck butts were funny. She is not the only one. There will be a Birdwatchers Guide to Duck Butts Workshop at the Bosque del Apache Refuge this weekend. Check the link http://http://www.friendsofthebosque.org/Friendsindex.html#whatsnew


Wednesday, June 24, 2015

Clipless vs Power Grips


After using Power Grips for the past two years, last week I switched to a clipless setup (Crankbrothers Candy 3 pedals and Mavic Cyclo Tour shoes). Having ridden with the new setup for about 100 miles now, it's pretty clear that I will be sticking with it. And while the feel of riding with Power Grips is still fresh on my mind, I wanted to compare my impressions of the two systems.


The purpose of both Power Grips and clipless pedals is to provide foot retention, which many roadcyclists find useful. Power Grips are thick diagonal straps that bind your feet to the pedals while still allowing easy escape. They can be worn with street shoes. To extract your foot, you must slide it back while rotating the heel outward. Clipless pedals contain binding mechanisms that latch on to the cleats attached to the bottom of cycling shoes. They can only be worn with special shoes.To extract your foot, you must rotate the heel outward until the cleat disengages from the pedal.


As far as foot retention, I do not feel a huge benefit to using clipless over Power Grips (assuming that the Grips are adjustedtightly). In two years of using the latter, never once have my feet accidentally come out. With the clipless setup, the connection to the pedals is more secure and more precise, but in all honesty I am not sure it's necessarily "better" as far as power transfer and what not, at least not for someone at my current level of ability. I have not noticed any difference in speed after switching to clipless.


The ease of clipping in and unclipping feels about the same. Having found a brand and model of clipless pedals I am comfortable with, I do not experience difficulty using them. Clipping in does require more precision than sliding my foot inside a Power Grip, but once mastered it is actually faster. Clipping out is very similar to extracting my foot from a Grip, requiring the same rotation of the heel. The time it takes me to unclip is about the same.


The main reason I prefer my new clipless setup to Power Grips - and this was entirely unexpected - is that I find it considerably more comfortable.I had not even realised how much discomfort I was experiencing until I switched to the clipless shoes. Before I would occasionally get blisters and numbness from the straps, which is no longer an issue. And it's great not to feel anything pressing down on top of my feet. I do not feel the spots where my shoes attach to the pedals, so there is no pressure on the soles of my feet either.


Needless to say, these are all just my personal impressions and are by no means intended as some definitive verdict. I've been getting requests for a comparison and did not want to wait until the memory of using Power Grips faded. As before,I think Power Grips are a fantastically useful product for those who do not feel comfortable with clipless pedals or simply do not want the commitment of having to wear special cycling shoes on their roadbike. I have done paceline rides and fast group rides with Power Grips, and it's been fine.That said, the difference in comfort I've experienced makes me glad I've finally mastered clipless, and I don't see myself going back.

Saturday, June 20, 2015

Making an Ordinary Vintage Roadbike Extraordinary (a Review of Sorts)

The Co-Habitant's roadbike, Myles, is a 1976 Motobecane Super Mirage, which he acquired in Spring and has been gradually updating with modern components and personal touches. It is his only roadbike, and he has cycled somewhere between 2,000 and 2,500 miles on it through its various iterations. I wanted to write a review of it (from my perspective), because I think it poignantly illustrates some aspects of owning and customising a vintage roadbike.


It is always interesting to observe people's reaction to 
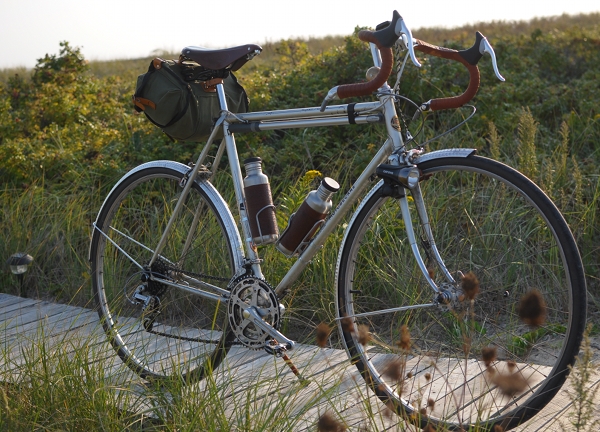
Myles, for he is a real head turner - even more so than my 
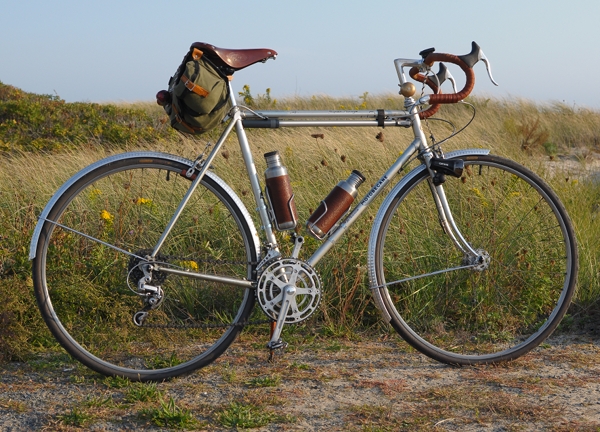
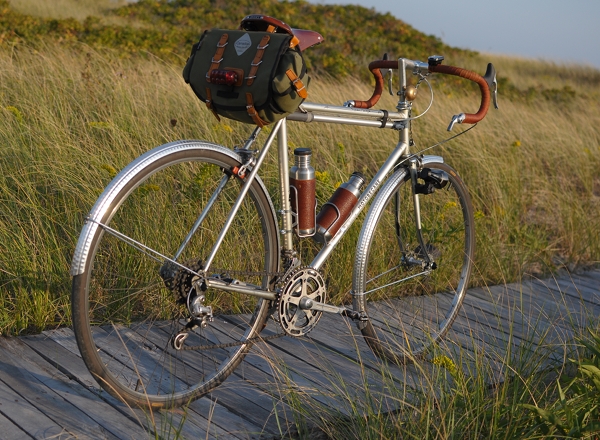
Rivendell. The silver frame, the hammered fenders, the wealth of brown tones in the leather and twine, the frame pump looking almost like a double top tube, and the classic Carradice bag, somehow combine to create a whole that is more magnificent and eye-catching than the sum of its parts.


On closer inspection, those who know bicycles typically exhibit one of two reactions. Some are delighted to see a good, ordinary vintage bicycle salvaged and turned into a thing of beauty. Others are bewildered that we bothered to so elaborately refurbish something so commonplace, rather than searching for a frame with a more impressive pedigree. While the Motobecane Super Mirage was a good, solid bicycle in its time, it was decidedly middle-tier and for that reason unremarkable. The frame is hi-ten steel, the lugs are fairly basic, and the original components (Suntour, Weinmann) are pretty good, but not excellent.


We do not disagree with the point of view that a better frame would have been more deserving of all the DIY lavished on Myles. But sometimes a bicycle just evolves organically, and such was the case here.


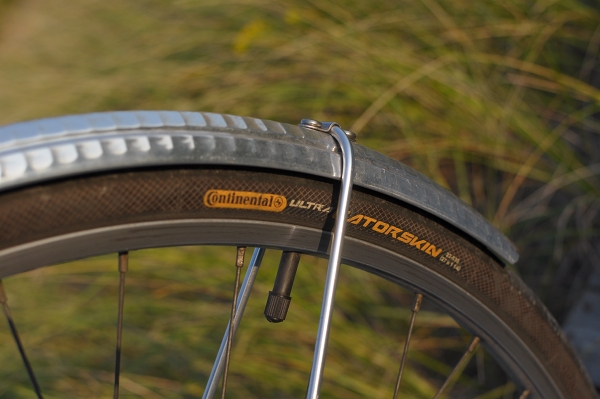
When the Co-Habitant found the bike, used and somewhat abused, the plan was simply to ride it after a few minor changes.He first replaced the tires, after the original ones blew up on his very first ride. He has ridden theseContinental Gatorskins (27" x 32mm) the entire time without incident.


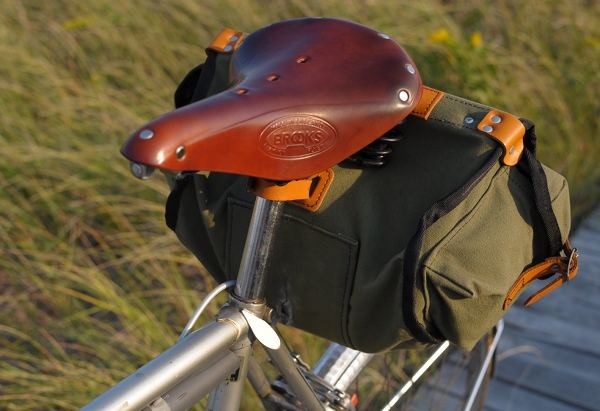
He then replaced the original vinyl saddle with a Brooks Flyer. Early on, he was caught in the rain and the Flyer got wet - which hastened its breaking-in process nicely.


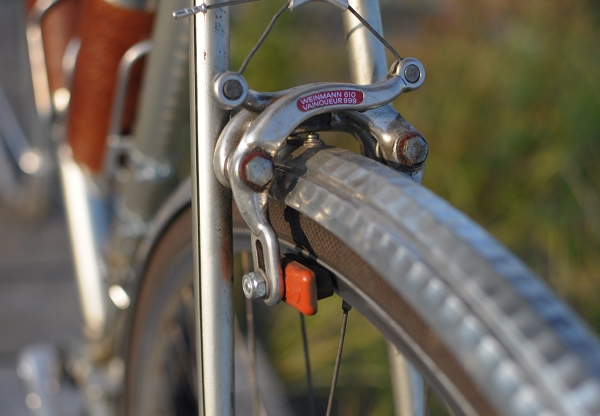
The brakes on the bicycle worked fine after some adjustment, but he did replace the pads with the salmon Kool-Stops.


As he began riding the bicycle more and more, he added fenders and a saddle bag. Although I am normally not a fan of hammered Honjos, I think they do look good on silver bikes - providing textural variation where the colour is similar. Hammered fenders are also a good investment in terms of hiding dents or scratches.


The Carradice Barley bag has been sufficient for carrying anything he needed on this bike, up to our current trip. For the future, he will consider getting a larger bag that can fit laptops, and a rack to support it. Having a saddlebag is also handy for installing a battery-operated tail light, such as his CatEye.


His headlight is mounted on the fork, using a Minoura light mount. While he prefers generator lighting, as far as battery-operated lights go, he likes this system very much.


Some months later, he decided to replace the handlebar set-up, as the original one caused discomfort and difficulty operating the brake levers. He replaced them with 42cm Nitto Noodle bars, which he loves,and the stem with aNitto Technomic.


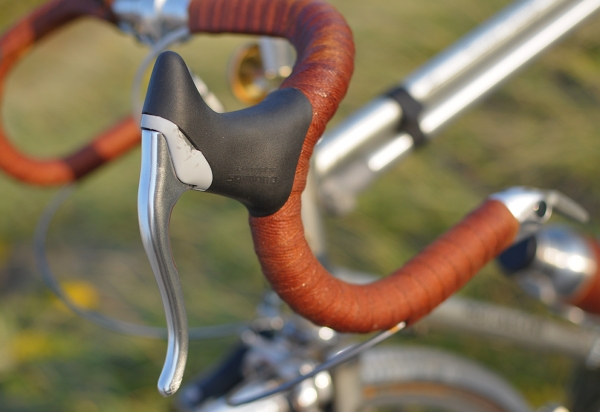
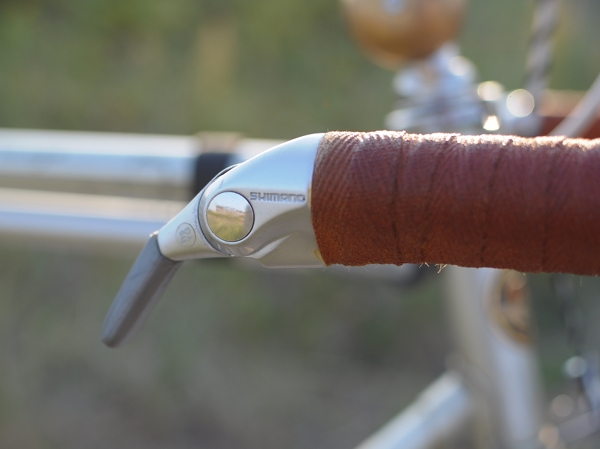
The original non-aero brake levers were replaced with modern Shimano aero brake levers. Personally, I am not a fan of these brake levers, as the hoods have a rather harsh surface and there is a plastic insert that is very easy to damage. The Co-Habitant has dropped and crashed this bike several times, and you can see that the levers look battered.


Almost a year later, a few more changes were made. After complaining that his feet always slipped on the touring pedals at high speeds and that toe clips were a bother, he installed these SPD clipless pedals - much to my shock at the time. He loves them and now says that he would not go back to non-clipless on a roadbike, vintage or not.


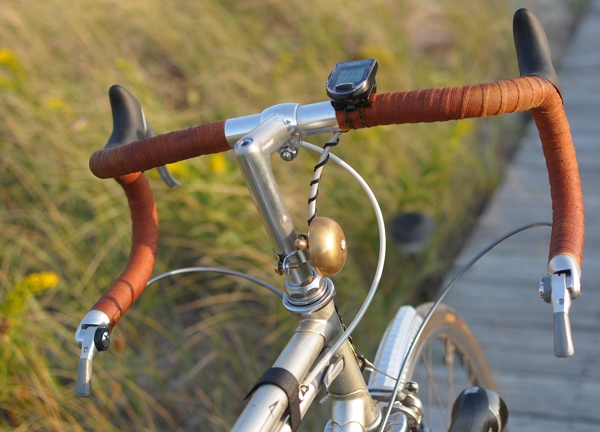
Around the same time, he also installed a CatEye computer to keep track of his speed and mileage,


a Topeak frame pump,


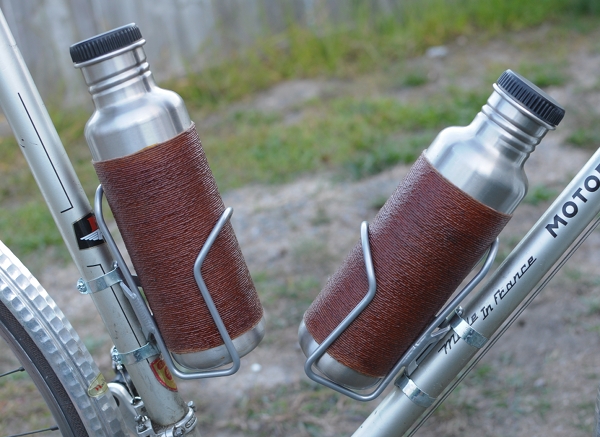
and two bottle cages, bolted onto the frame - into which he places his twined and shellacked Klean Kanteen bottles.


And the final update - completed just a couple of weeks ago in our yard - was the replacement of the original stem shifters with these Shimano bar-ends. Since the bike is a 10-speed, it isn't possible to get indexed shifting, but these work just as well in friction mode. After having used a shifting method that sounded like a tractor for over a year, the Co-Habitant is absolutely delighted with these - they are fast and quiet, and he is convinced that they are superior even to my Silver shifters (although I disagree).


And so that is the story of Myles's slow but steady transformation from a plain '70s French 10-speed to a glorious and shamelessly eccentric dandy. Was it worth it? It certainly helped the Co-Habitant learn about classic roadbikes - both riding them and working on them.It is difficult to get a straight answer from him about how comfortable the bike is, especially as he is more tolerant of discomfort and pain than I am and to some degree even thinks these are "normal" to experience on a roadbike. But from what I can surmise, the bike is more or less comfortable in its current state, except that it places a bit too much weight on the hands and is over-responsive to the point of being "squirrely". Also, the frame size would ideally be larger, and he could do with better gearing.


All of these comments, however, are made only in response to my direct questioning; he never complains about the bike on his own accord. On the contrary, he is extremely fond of Myles,smiling and shaking his head quietly at any suggestion that such components ought to be placed on a new frame instead.

Thursday, June 18, 2015

La Sportiva Nepal Cube?

Nepal is one of the very best all around boots from La Spotiva. And it just keeps getting better.


This is a quick look the newest CUBE version. Carbon honey comb mid sole like the Batura 2.0 and a new toe cap as well. The Batura 2.0 was a total revamp of the Batura. I'd expect the same make over with the Nepal. More than first meets the eye generally from La Sportiva. Available Fall of .


More here: http://coldthistle.blogspot.com//06/la-sportiva-back-at-ya.html

Sunday, June 14, 2015

Gunks Routes: P-38 (5.10b)


(Photo: Past the low crux overhang and into the awkward corner of P-38 (5.10b).)


Gail and I recently got out for a little weekday fun in the Gunks.


We saw little reason to stray too far from the Uberfall. There were lots of people around, to be sure, but nothing approaching the weekend crowds.


The spring weather was delightful and my only big goal for the day was to hit at least one 5.10 from my list. After spending a few pleasant hours in the Frog's Head area we decided it was time. We headed over to P-38 (5.10b). Gail had followed it before but it was years ago. I had never tried it so it was to be an onsight attempt for me.


Sitting as it does within spitting distance of the outhouse known as the "Über Pooper," P-38 is for most climbers a familiar sight. The slanting crack that defines the climb is obvious from the road below.


I wanted to do it because of that crack. I expected it would provide good gear. About the climbing, I guess I knew very little. I thought, not unreasonably, that I was in for a crack climb. But it turned out that there isn't any crack climbing on P-38, which is cool because I'm no good at that anyway!


I was hoping that maybe, just this once, I'd onsight one of these 5.10's. I have not had much luck with getting them clean. Over and over again I've had to work the cruxes a bit, or on some occasions I've even had to back off.


The first hard move on P-38 comes right off the deck, as you attempt to surmount a little overhang that is just over your head as you stand below the climb. There is pro here, and I actually placed two pieces as I stepped up and down, several times, working out the opening move. Eventually, after several reconnaissance missions, checking the gear and making plans, I executed my little sequence and made it up over the little roof.


Success! Maybe I was on my way to victory.


I was surprised by the next few moves. I thought the climb would be sustained and awkward. And it is sort of awkward, but after the opening moves it is really pretty easy up to the crux. There are jugs outside the crack and you can actually wedge your leg into the crack as you move up, providing opportunities to place gear, rest and shake out.


Soon enough I arrived at the crux sequence. You'll know it when you arrive there. There is a delicate step left to a little dish for your toe, and then a couple of thin moves up to a tantalizing ledge, so close but yet so far.


I placed what I thought was a bomber purple Camalot and then made the step left. As I tried to move up I thought about placing more gear but the climbing was pumpy and insecure. I just wanted to move-- the rest stance was in sight-- and so I did, without dealing with any more placements. I moved up once, feeling like I was barely in balance, just holding on. I thought that if I could make one additional move, a high-step to a polished pebble, I would be through the crux.


I was just a move away, but as I tried to get my toe on the pebble I lost the grip and took a fall. It happened suddenly and caught me a little bit off guard. I meant to yell "falling!" But instead in the moment said "take!"


Of course it happened so fast that Gail couldn't take; she just caught me as I took what turned out to be a pretty good whipper. The Camalot held just fine and the fall was totally clean. It is steep there and the gear is a little to the right so there isn't much risk of the rope catching your leg. It is about the best fall you could hope for.


Still I was a little taken aback by how far I fell and as I went back up, onsight already blown, I decided to place more gear before trying the crux again. I ended up getting a higher cam from the rest stance and then, after moving left again, I placed a great red Alien from the delicate position after you step up into the crux sequence. I ended up hanging a couple of times as I placed the additional gear and then, as I got set to try the final crux move again, I took a couple more falls as I rushed it trying to get back to the crux move and then failed at the crux when I tried to repeat the same sequence I used the first time.


Hanging there, I told myself to focus. I had come closer to success on my first try than I had on my subsequent fumbling efforts. I needed to execute my beta to get to the final move, and then try something new. I visualized exactly what I planned to do and then tried to be precise and patient.


And this time it went like butter. I danced up to the final move. Then I switched feet and stepped through up to the polished pebble, and it flowed. It actually felt easy, and I found myself at the rest stance, wishing I'd thought to try the move this way the first time. I came so close to the onsight! One little pebble away from victory.


I seem to find myself saying this every time, but now that I've worked it out I think I can go back and get the redpoint. I remember the whole sequence and I think so long as I'm careful I can climb it without a problem. The only question is whether I will be able to do it while placing the extra gear mid-crux. This gear isn't strictly necessary but I'd like to have it. If I decide to place it the crux will be a little bit harder.


Once the crux is over, P-38 eases off considerably. There is an easy traverse left and then a few 5.8 moves over a bulge to the finish. Some describe this section of the pitch as run out, but I did not find it to be so. I placed a couple of Tricams along the traverse and a nut in a flake right below the sloper holds that take you over the final bulge.


Once up on the finishing ledge, I was surprised to find the traditional belay tree long gone. There is no tree, just a rotting stump, which is obviously not a suitable anchor. I arranged a belay with gear placed between the huge boulders on the ledge, but you could also go to the top and belay from a living tree. The walk-off down the Uberfall is very close if you choose to go all the way to the top. If you belay on the ledge as I did you can use the Radcliffe descent which is right there behind the climb. This was my first time down Radcliffe and it is a little more exposed at a couple of spots than the Uberfall descent.


P-38 is a really good little climb. I will go back to send it. It has two stiff cruxes, one at the opening move and then a harder, more technical crux above. It has some unusual moves for the Gunks, good gear, and it could hardly be more accessible. I am bummed out that I didn't figure it out the first time, but I shall return!

Thursday, June 11, 2015

Wednesday, June 10, 2015

Dolphins At Play

One of my favorite things to do at Sea World is to watch the dolphins.

I especially like it when they are moving around in what I assume is more natural and less "trained" ways.

To watch them move through the water is a beautiful thing.

It might just be me thinking it should be so, but they just look happy to be moving about so freely.

Even if they aren't really smiling, they put a smile on my face. Dolphins are truly amazing creatures. It is always a wonderful thing when we can watch them, especially when we can get this close to them.

Living the life in Florida!

Monday, June 8, 2015

New Irishtown Mixed Route, Dirty-T M4+


Laura Hahn seconding the new route Dirty-T M4+
Laura and I put up a new mixed line at Irishtown. Its located a hundred feet or so left of Dynamite. There is a line of ice in between the two mixed lines named Pale Wildwood Ice Tower - WI4. Its not quite in yet, but should be touching down by mid next week. Dirty T M4+. It climbs up through some ledges and face passing 3 bolts. Climb up through a small overlap to the ice and finish it up with turf to the trees. Lots of fun climbing for almost anyone. Great introduction for the climber looking to combine rock and ice.


Pulling up onto the ice


Top of the ice section


Turf to the top
The route name came from all the dirt that came off of the cliff and ended up all over me. It started out with me being clean and the route being dirty and ended with me being dirty and the route being clean. Enjoy!


Dirty deeds done dirt cheap


Ancient ice tool used by the Irishtownian ice climbing tribe

Friday, June 5, 2015

Eternal Dancers


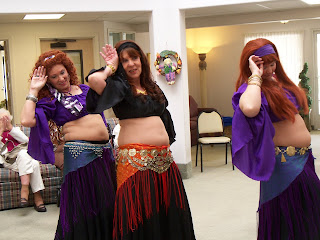
  1. My sister, Sarah, got into belly dancing about 30 years ago to loose weight. It worked and she loved the dancing. She still does it and teaches classes in gypsy dancing, belly dancing and simular styles several times a week in her home. On the day I was there her group called the Eternal Dancers were doing a performance for one of the retirement homes in Las Cruces. I went with them and took photos. Sarah is the lady in the black and orange custume. Denise is the lady with the long curly hair and Jennifer is the lady with straight hair. The seniors and employees at the home loved the show. It was the second time they had danced there and they have been asked to come again. On this day only 3 of the dancers were able to preform but there are several more in the troop. This was a free preformance but they do dance for other events for a fee.